Photo/Digital
Microscopy
|
To capture a digital photo: You will be able to capture images using the CCD camera and computer interfaced to the microscope. The images should be saved as filename.jpg computer files (where filename is the file name and .jpg is the common designation used for digital photographic files.) You will save these to your folder on the desktop. 1. Turn on the computer and log in as name: bio, password: bio1. Turn on light source for the microscope and the UV burner. Set the filter mirror cube to setting 1, no filter.
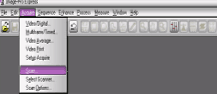
3. Go to the toolbar and click Acquire and then click on Scan.
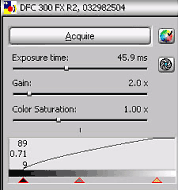
4. Set the objective to 10X and phase ring to zero. To view the specimen through the eyepieces follow the microscope found on the Virtual Microscope website. Focus the fine/coarse knobs on the microscope until the image becomes clear. Now set the phase ring to Ph1. View the image and adjust light/focus as needed. Select the appropriate objective and phase setting, and check out the screen image and refocus as needed before capturing the image on the screen. 5. You should now set the white balance of the image. Move the slide using the mechanical stage so that you can view a section of the slide where no sample is located. Click on the white balance icon located right of the Acquire button.
6. Bring the specimen back under the lens and you should adjust exposure time (overall brightness), gain (color brightness) and color saturation (how blue the blue is, etc.). 7. To acquire an image click on Acquire. Minimize the screen to reveal the captured image on the capture screen. 8. Go to File > Save as; set the format type to JPEG. File must be saved in this format: filename.jpg. Save it to your folder that was created for you on the Desktop.
|
Adjusting
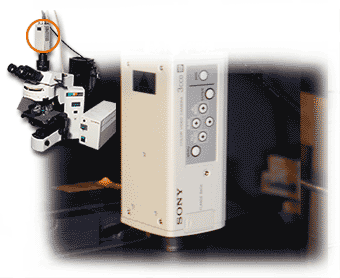
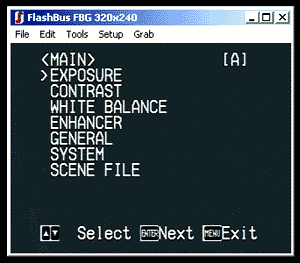
the Camera Settings: 1.
To adjust the camera settings, click on the menu button on the side
of the camera. 2. The adjustment options will appear on the computer screen in the FlashBus window. To see options click the arrows on the camera and make selections by pressing enter on the camera.
|